Interior Paint Prep
Share
Before you tackle an interior paint prep project, take a moment to walk through it in your head. Identify the potential problem areas and put together a work-around. Or better yet, two workarounds in case the first one doesn't pan out. You don't need to have every detail sewn up—that will come as you gear up the prep. But 10 minutes of forethought can save hours of frustration when you're in the thick of things. As you put together your painting project plan, jot down key items to create a working checklist. This list is a useful reference during the actual project. And in the same way that a spring home maintenance checklist is when the weather warms up.
Unless you're working in an empty room, you'll likely have to move furniture out of your way at some point of the interior paint prep process. If you skip this step, you risk damaging the furniture or discovering the rough outline of a dresser or bed frame on the wall when you finally do redecorate. A similar problem pops up in bathrooms, where the wall colour often makes an abrupt stop at the side of the toilet tank. Move items away from the wall towards the centre of the room or remove them entirely. Cover the furniture with painter's plastic. And identify the items most vulnerable to paint damage, such as items with fabric upholstery, and take special care with them
Once the furniture has been pulled away from the walls, you'll be able to see all the light switch and outlet covers. Remove them, along with any vent and return covers. Why interior paint prep matters: While you certainly can choose to paint over or around these items, the visual separation between the wall and the cover plates will be blurred. This leaves a ragged and unprofessional look to these items that are often highly visible. Also, when you do need to remove an outlet cover down the road, a paint covered outlet can lead to tearing and pulling loose the paint or drywall surface paper.
Lay out floor coverings in the area where you'll be working. If you're painting a wall, it's a good idea to provide cover at least 3 feet away from the wall. If you're painting a ceiling, cover the entire floor. Canvas drop cloths are absolutely the best coverings for carpet. They're easy to spread out, and unlike plastic, they stay put without tape. And they won't cause your ladder to slip-slide on carpet. Just bunch them up a bit along walls and they'll stay where you want them. Normal drips and splatter won't soak through canvas, but heavy spills will. Pick up the drop cloths and scoop up spills with a broad putty knife or dustpan. These drop cloths aren't cheap, but you don't have to cover the entire floor.
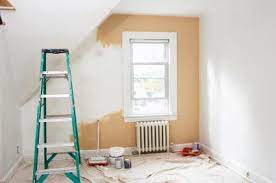
If you'll be painting anything more than a foot or so above your head, you should have appropriate platform support. For most DIY interior paint prep projects, this will be as simple as a stepladder. But if you're tackling a stairwell or vaulted great room, you'll want to look at setting up a scaffold system. Set up the scaffold before you need it, to make sure you don't lose your wet edge while painting. It's important to take the time to set up scaffolding securely, and double-check its stability.
You must remove any foreign substance that's on the surface you want to paint. If you skip this step, the paint will not adhere properly to the surface and will likely peel off. Luckily, cleaning the surface is relatively simple interior paint prep. Dry debris such as dust, pet hair, or sawdust can be wiped off with a microfiber cloth, while tackier material such as grease will need to be washed off with a solution of dish soap and water. Be sure to hit all surfaces that you'll be painting. That includes walls, ceiling and trim. It's possible that during cleaning you'll find more extensive damage to the wall surface.
This interior paint prep step is short but crucial. Before you open up a single can of paint, make sure you have something close at hand to use to wipe up spills. If you're using latex paint, have water and rags on hand. And if you're using oil-based or enamel paint, have mineral spirits or the thinner recommended by the paint manufacturer. If you're not sure, check out the directions for clean-up printed on the side of the can.
The last interior paint prep step before breaking out the brushes and rollers is to double-check the paint itself. Open a can, make sure that it's fully mixed. And then apply a small coat to your paint colour swatch or to an inconspicuous area of the wall Try painting behind some of that furniture you moved away earlier. At this point you're simply verifying that there wasn't an issue with the paint tint. Or that there was a miscommunication about what shade was going up in the bedroom or the bathroom. Once you know you're good to go, then at last you can start painting! Painting isn't an easy project, but by following these tricks, you can greatly simplify the process. And you'll quickly see an improvement in the way that your walls, ceilings, and even doors look crisp, smooth, and professionally done
